Before you begin
- Confirm the selected item and its on-screen interaction prompt.
- Compare visible effects and readouts without guessing at hidden damage formulas.
- Reset between trials and keep view and settings consistent.
An observation guide, not a damage ranking
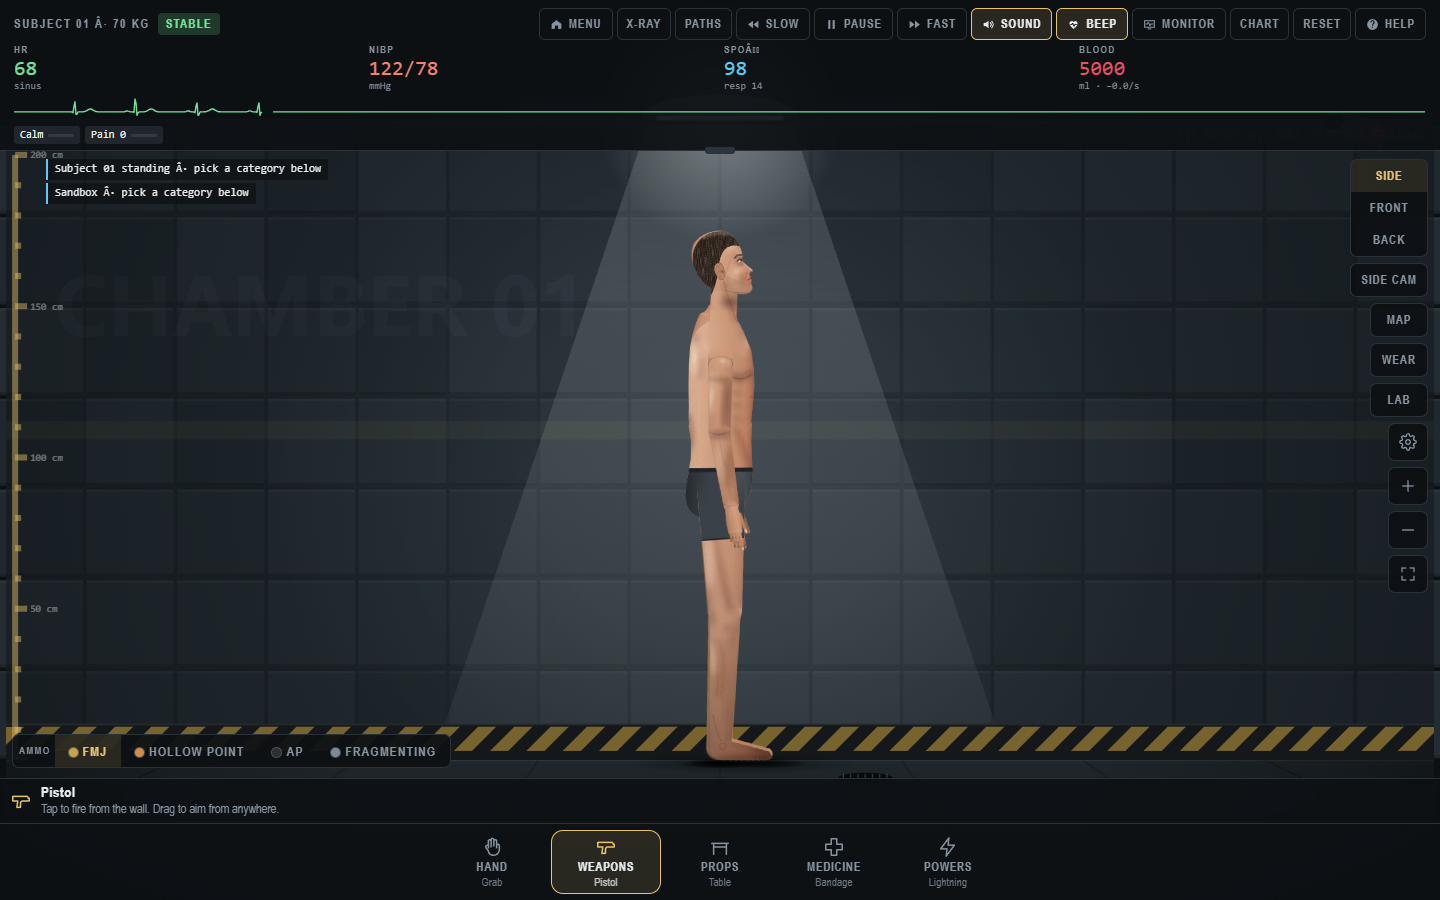
Weapons and Powers are prominent in Trauma Lab, but a useful guide should not pretend that one screenshot establishes a universal damage table. The browser build captured on 31 October 2026 had a Weapons category, a visible ammunition strip for some firearms, a Powers category, X-ray and Paths controls, a patient monitor, and a Chart panel. The creator's v1.21 updates name additional weapons and active ragdoll responses. Those systems create many variables: item choice, mode, view, target, timing, body movement, graphics settings, and build version. This guide teaches how to compare the game's feedback while staying within the fictional adult context.
Trauma Lab contains graphic violence and gore. The names of weapons here are taken from the game and developer notes, not recommendations for real-world use. We do not give operational instructions for actual weapons or harmful acts. If you only want to learn the interface, the Start Here guide and Tool Categories are better first stops. This article is for players who already know how to reset the scene, read the monitor, and identify the selected game item.
Begin with the selected item
The bottom strip can show a default selected item under Weapons. In the observed build, Pistol was visible along with a short instruction line. Do not assume that opening the category changes the item; check the highlight and text. An item picker may show a larger catalog, and the selected name can persist when you close it. The ammo strip near the lower left displayed FMJ, hollow point, AP, and fragmenting choices in the observed screenshot. These are in-game labels. A visible selection is part of the test setup, and it should be noted before comparing outcomes.
Start from a reset, leave the camera at one view, and use one in-game action. Then inspect the wound information, monitor, X-ray, Paths, and Chart in a consistent order. If you want to compare another item, reset first. If you want to compare an ammo option, keep the item and view constant and change only the option. Because the subject may move after an event, record the initial position and whether the event occurred while the subject was already moving. An uncontrolled sequence of many actions is entertaining, but it is poor evidence for a specific mechanic.
Do not infer that an on-screen label maps to a real ballistic effect. The creator describes tracking through skin, muscle, bone, and organs as part of the game model. The exact algorithm is not published in the sources checked here. Describe what the game displayed: a wound entry, organ bar change, monitor shift, or animation. Avoid presenting the game's numbers as real physical measurements or teaching how to cause an outcome outside the game.
New items in the developer notes
The v1.21 free post names a taser, stun gun, police and electric batons, chainsaw, circular saw, hand drill, laser pistol, laser machine gun, and katana, among other visual changes. The playtest post gives more detail on how some of these appear in the game. The list is useful for checking whether a current build contains the feature, but it is not a guarantee that every free, supporter, browser, or cached build has identical content. Verify your version and search the relevant category.
Some names are similar across categories. A laser pistol and laser machine gun are listed as weapons, while the developer describes a laser beam under Powers. If you are searching the interface, check both labels rather than assuming all “laser” items are in one place. A saw or drill may have an interaction prompt different from a firearm. Read it in the game. The purpose of comparison is to understand the implemented interface, not to rank items by graphic effect.
The same update notes describe active ragdoll behavior, ropes, and outfits. An outfit can change a visible response, and active ragdoll can change the animation even if another status field is similar. Keep those conditions fixed when you compare two items. If you change weapon, outfit, view, and physics speed together, you cannot attribute the result to one choice. The physics guide covers those scene variables in detail.
Visual effect versus registered effect
A bright effect, sudden fall, or large animation is not the whole state. The monitor can show a status change; Chart can list organ or bleeding values; X-ray can expose internal layers; Paths can illustrate a route. These are different outputs. An action might look dramatic but leave a particular chart section unchanged. Another might register a chart entry with a modest visual. Report both. A useful note says what the game displayed in each interface, rather than making a single judgment about “damage.”
To avoid overlooking a detail, use a fixed inspection sequence. Before the event, open Chart for a baseline and close it. After the event, pause if necessary, note the top monitor, open Chart, inspect the relevant section, close it, toggle X-ray, and compare Side and Front. Do not use Reset until the observation is complete. If an overlay blocks another control, close it instead of clicking through it. This method makes a complex game readable without demanding that you understand its internal code.
If a path appears in the game, record the selected view and layer. A two-dimensional screenshot can mislead about depth. The subject may have moved between input and effect. Repeating from a clean reset with a similar aim point can help you decide whether a result is stable. Do not write a universal penetration claim from one path line. The game is still being updated, and a later build may alter the calculation or display.
Comparing fictional powers
Powers is a separate bottom category with a Lightning label visible in the observed build. The creator's v1.21 notes mention a laser beam in that category. These are clearly fictional abilities, and the useful questions are about interface and feedback. Does the item need a tap or hold? Is there a visible range or target cue? Does the game log a state change? Does a performance setting affect how smoothly the animation appears? Read the current instruction strip before answering any of these.
Use one power in a clean scene, document the result, then reset. If comparing two powers, keep the same camera and scene settings. Do not compare the maximum spectacle of one with a small single action from another. A consistent test is more informative. If you are comparing a power with a weapon, label the categories because similar-looking effects may be implemented differently. The goal is to understand what the game did under a known setup, not to create a fictional league table of real-world severity.
Powers can also interact with the environment. A scene prop, map, outfit, or second body can change what is visible. Remove those variables for the first trial. Add them later deliberately if that interaction is the question. When the scene becomes crowded, reset and rebuild it one object at a time. This is faster than trying to infer cause from a dozen simultaneous effects.
Performance is part of the comparison
The v1.21.2 performance update explains why repeated heavy events previously caused lag: wound graphics and other details were redrawn too often. The developer reports improvements and still notes that cheaper phones can dip with full-auto effects. This matters to a guide because dropped frames can make motion and timing hard to judge. Before claiming a tool has a delayed or inconsistent effect, try a simpler scene and a suitable graphics preset.
The creator's Graphics → Performance menu includes Best looks, Balanced, and Max speed quick setups, along with separate controls for frame rate, resolution, detail, blood and gore amount, and physics precision. Balanced is suggested in the update for a phone that lags. If you change a preset during a comparison, record it. A screenshot from Best looks and one from Max speed may differ visually even if the underlying game state is comparable. A video captured at a low frame rate may conceal intermediate animation.
If your device struggles, reduce the number of effects and reset often. Open Chart after the scene stabilizes. A simpler test is not less valid; it is often better because the feedback is easier to see. The performance guide explains a structured troubleshooting sequence and distinguishes loading problems from simulation slowdown.
A three-trial comparison method
Choose a narrow question about two in-game items. Write down the build, mode, view, outfit, graphics preset, selected item, and ammo or power setting. Reset. Perform one action with the first item, then inspect the monitor, Chart, and visual state. Repeat twice more from a reset. Record variation rather than averaging away surprising outcomes. Next, switch only the item and run three comparable trials. This is a practical player experiment, not a scientific study, but it is far stronger than a single unrecorded impression.
When results vary, inspect the setup. Did the subject move? Was the item applied at the same point? Did the game show a hit or miss? Did a prop obstruct the scene? Was the game paused or slowed? Did a menu remain open? Could the frame rate have dropped? These questions often explain disagreement without inventing hidden mechanics. If they do not, describe the variation honestly and link to the build or screenshot that shows it.
The experiment should end with a limited conclusion. “In the three trials I observed, the Chart displayed a change in this section after this in-game action” is supportable. “This item is always strongest” is not, because strength is undefined and the game is changing. A guide earns trust by stating what it measured and where its evidence stops.
Outfits and protection claims
The v1.21 playtest notes describe new outfits, including SWAT gear with a helmet and face shield, and describe in-game protection for certain attacks. That is a versioned creator statement, not a real protective-equipment specification. If you want to compare an outfit in the game, use a clean subject, change only the outfit, perform a comparable in-game test, and inspect the game feedback. Repeat with the default appearance. Do not infer any real-world safety performance from the result.
The Wear menu can also change visible layers and obscure what a screenshot shows. Include the outfit name or Wear panel in your notes. A missed visual effect might be hidden by clothing even when a chart field changes. Conversely, a cosmetic change can look significant without altering a mechanical field. The physics guide gives a fuller method for comparing clothing and scene configuration.
Sources and related reading
The category buttons, ammo strip, monitor, X-ray, Paths, and Chart were observed directly in the browser game on 31 October 2026. The official itch.io page describes the game and its development status. The v1.21 playtest, v1.21 free, and performance update provide versioned claims about added items and rendering behavior.
For the interface basics, go to Controls. For understanding the feedback after an event, read Anatomy and Monitor. For a ready-to-use record sheet, continue to the Experiment Workbook. The shared principle is simple: observe the fictional software carefully, cite the version, and do not turn game effects into real-world guidance.
Trauma Lab is in development. Check the official game page and developer updates for current availability and changes. This independent guide discusses a fictional game, not medical practice.