Before you begin
- Start with a question that the game can visibly answer.
- Change one variable, record the result, and reset.
- Repeat before treating an observed outcome as a stable game rule.
A workbook for a changing game
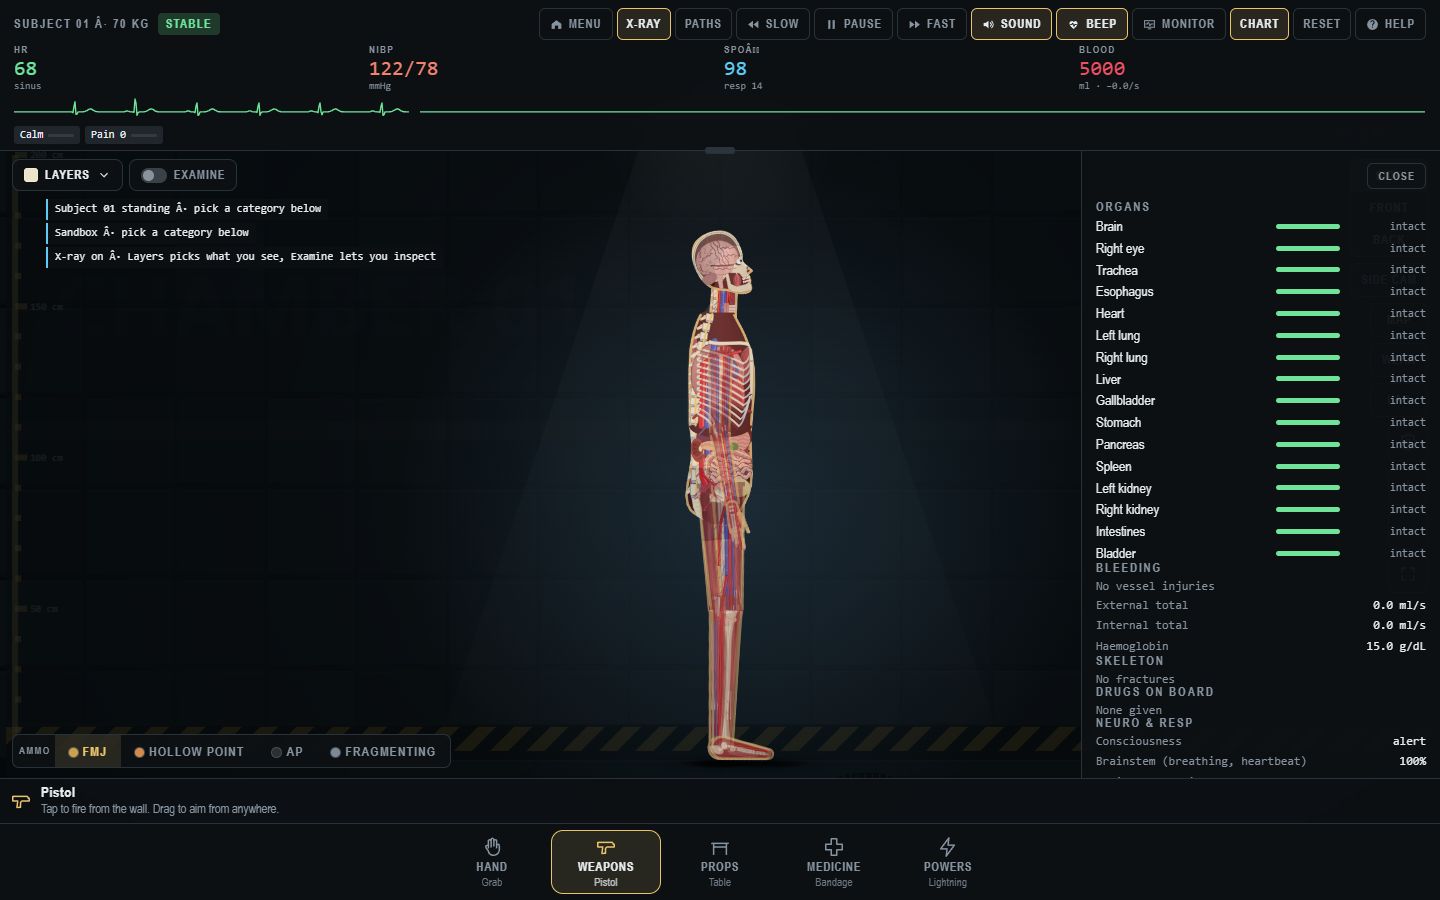
Trauma Lab invites experimentation, but a long chain of actions can make it impossible to tell why the scene changed. This workbook gives you repeatable tests that use the interface visible in the browser build checked on 31 October 2026: Sandbox, Side and Front views, X-ray, Layers, the bottom tool categories, the top monitor, Chart, Reset, and performance options. The exercises are questions, not promises about outcomes. They are designed to help you learn the fictional simulation while keeping the build and settings in view.
The official itch.io page describes the game as an anatomy and physics sandbox in development. The creator's updates have changed menus, items, body behavior, and performance in days. For that reason, a good experiment records the version and leaves room for a different result. Nothing here is a real medical, physics, or weapons exercise. The game contains graphic content and is intended for adults.
The one-variable record sheet
Before each trial, write: date, build or version if visible, platform, mode, map, camera view, selected tool, any ammo or item setting, surgery setting, graphics preset, and whether mods are active. Record the baseline monitor and Chart fields relevant to your question. Then describe the input in one sentence and the game's response in another. Reset before the next trial. This can fit in a small notebook or text file; it does not require a spreadsheet unless you want one.
Use separate columns for “seen,” “shown by the interface,” and “inferred.” For example, “the subject leaned left” is seen; “Chart listed a changed organ bar” is shown by the interface; “the tool always causes that motion” is an inference. This separation helps you avoid overclaiming from one run. If the outcome is surprising, repeat the same trial twice before changing the question. If you cannot reproduce it, note that rather than discarding the observation.
Keep a baseline screenshot when possible. Capture the whole game area so the active view, selected category, and monitor remain visible. After the action, capture the same framing. A close crop can be useful for a visual detail, but it should accompany a full view that establishes context. The six original game screenshots in the guide library illustrate how much information sits around the subject.
Exercise 1: learn the camera before the tools
Reset in Sandbox and do not use a tool. Begin in Side view and note the subject's position relative to the chamber grid. Switch to Front, then Back, and return to Side. Turn X-ray on, repeat the view cycle, and turn it off. Observe which structures become visible and which are merely hidden by the selected drawing mode. Do not interpret the X-ray display as an actual radiograph; it is a game visualization.
Now zoom in one step, then use the fit control to return to the subject. If an object seems missing later, remember this exercise: a camera change can hide something that is still present. Record whether the game preserved your selected view after Reset. If it did not, add the view to every future trial setup. This simple camera test makes every later comparison easier because you know how to restore a consistent frame.
Exercise 2: compare a menu with a selected item
Open Medicine, examine the groups and search field, then close the picker without choosing a card. Note whether the bottom instruction strip changed. Reopen Medicine, choose one visible item, and close the picker. Note the new instruction text, but do not use the item yet. The question is whether opening a category and selecting a tool are distinct actions in your build. They should be recorded separately because a screenshot of an open menu does not prove that anything was applied to the subject.
Repeat with Props. Clear the search box between trials. If the picker remains open or a dark scrim blocks the chamber, use the panel's close behavior before trying another category. This exercise teaches interface state, not injury mechanics. It is especially valuable on a phone where the item grid may cover most of the game area.
Exercise 3: place one prop
Reset to a clean Sandbox scene, choose one Props item such as a table or crate, and place it away from the subject. Record the selected item name, view, approximate placement, and what the object did after appearing. Switch view once to understand depth, then return to the original view. Do not add a second prop. If the object moves, try to determine whether it moved on its own, collided with the floor, or responded to your pointer. Repeat after a reset from a similar placement.
For a comparison, choose another prop from the same menu group and repeat with the same camera and scene. Do not turn an on-card weight or material name into a claim about real materials. The question is narrower: how did the two game objects behave under similar in-game placement? If the results differ between repeated trials, document the variation instead of forcing a single rule.
Exercise 4: inspect a clean Chart
With no action taken after Reset, open Chart and scroll through the visible sections. Record the labels you can see: organ condition, bleeding, skeletal state, drugs, and any consciousness or respiratory readout. Close the panel. Perform one controlled in-game action, then reopen Chart. Which exact labels changed? Which did not? A monitor reading may summarize only part of the state, so compare the detailed panel with the top display.
If you cannot see a section on a phone, rotate to landscape or use a larger viewport before deciding it is absent. Record values as game labels, not clinical measurements. If nothing changed, verify that the action was registered and that Pause was off. Reset and try once more before concluding that a tool has no chart effect. A single failed input is not a mechanic.
Exercise 5: isolate X-ray and Layers
Reset, choose one camera view, and capture the ordinary subject. Turn X-ray on and capture the same view. Open Layers and change only the display layer. Note what disappears from the drawing and what remains in Chart. The question is whether the control changes visibility rather than the underlying state. Return to the original layer and turn X-ray off. Do not add a tool during this first comparison.
For a second pass, perform one in-game action after recording the clean X-ray baseline. Inspect Side and Front while keeping the same layer selection. If the subject moves, note that the two screenshots are not perfectly aligned. Avoid inferring a precise path from a two-dimensional image. Use Paths, wound information, and Chart if they are available in the build. The anatomy guide explains how to combine those displays without treating them as real diagnostics.
Exercise 6: test a mode restriction
In Sandbox, open each bottom category and note the names. Return to Menu, select Keep Him Alive, and compare the available categories with the case prompt. The menu describes this mode as medicine only. The question is whether the interface restriction is visible in your current build and how the game communicates it. Do not start solving the case until you have recorded the starting state and the available tools.
If a category is missing, do not call it a bug immediately. The mode may intentionally limit it. If a case gives an instruction that seems unclear, open Help and read the tool prompts. When you return to Sandbox, verify that the broad category strip is back. This exercise prevents tips from one mode being applied uncritically to another. The modes guide gives more context on each menu entry.
Exercise 7: compare surgery settings in the game
Choose a game scenario that presents a surgery interaction, note the mode and build, and begin with Simple. Follow the game's prompts only within the fictional simulation. Record the number of distinct item selections, the feedback text, and the resulting game state. Reset, switch to Complex, and repeat from as similar a setup as possible. The question is how the interface changes between settings, not which setting reflects real medicine.
If the two trials diverge because the subject moved or a case changed, say so. Do not fill gaps with a real-world procedure. The current browser interface includes named surgery tools, but their game sequence should be read in the current build. Avoid publishing a fixed step-by-step “operation” based on an old screenshot. The medicine guide explains why interface observation is the appropriate scope here.
Exercise 8: compare two graphics presets
Reset to a clean scene and use one repeatable action that is slow on your device. Record the current preset and frame counter if available. Try the same action after switching to Balanced under Options → Graphics → Performance. If it remains slow, try Max speed after another reset. Note whether input responsiveness, animation smoothness, and visual detail changed. The creator recommends Balanced as a starting point for phone lag in the v1.21 notes.
Do not compare a quiet clean scene on one preset with a crowded scene on another. That would test scene complexity and preset together. If the device is very slow, perform fewer actions and record the difference. A preset may improve smoothness while making fine details harder to see. Choose the one that supports your purpose. The performance guide covers granular settings and the developer's published optimization work.
Exercise 9: track a versioned feature
Choose one feature from a developer post, such as the v1.20 splint, the v1.21 active ragdoll, or the new performance quick setup. Read the specific devlog, note its date and release description, then look for the feature in your current build. Record whether the item or setting is present, where it appears, and whether its game prompt matches the post. Do not assume that a playtest-only announcement applies to every free build.
If you cannot find the feature, check your version, mode, category, search filter, and whether the page is cached. A missing menu entry is an observation, not proof that the creator's note is false. If the feature is present but behaves differently, describe the difference with a short reproduction sequence. This exercise is useful because Trauma Lab has changed rapidly and static guides can become stale.
Exercise 10: write a useful bug report
Pick a reproducible issue, not a one-time oddity. Reset, record the build, platform, browser or downloaded version, mode, graphics preset, selected item, and scene setup. Perform the minimum sequence that triggers the problem. Repeat from a reset. Capture one full-screen image before and after, or a short clip if motion matters. State what you expected from the game's prompt and what actually happened. Mention whether the issue occurs with mods disabled if you used them.
The developer's performance post explicitly asks for device, weapon, and fps details for lingering shooting lag. Apply the same specificity to other problems. Avoid uploading private files or system information unrelated to the game. A concise report that another person can reproduce is more valuable than a dramatic description with no steps.
Turn results into better questions
After a few exercises, look for a result you cannot explain. Instead of adding more effects immediately, ask which single variable could clarify it. If a prop seemed to pass through the subject, repeat with a different camera view. If the Chart changed without a visible effect, compare X-ray layers. If a tool seemed inactive, check Pause and the selected item. If a scene lagged, simplify it and use a different graphics preset. Each follow-up should isolate one cause.
Keep an “unknown” category in your notes. You do not need to invent a mechanic to fill it. The game is actively developed, and even a well-observed behavior may change in the next build. An honest note such as “I saw this once; could not reproduce it after two resets” protects readers from an accidental myth and gives the creator a useful starting point if the issue recurs.
The experiments are also a way to choose what to read next. Repeated trouble with menu layers points to Controls. Unclear tool grouping points to Tools. Confusing monitor or Chart feedback points to Anatomy. Slow scenes point to Performance. A good guide library should shorten the path from a specific question to the relevant explanation.
Sources and use limits
The controls and panels used here were observed in the browser build on 31 October 2026. The official itch.io listing identifies the project and its in-development status, while the developer log documents version changes. These exercises are original player-facing methods for exploring a fictional simulation. They do not claim access to the game's private formulas and do not instruct real medical or harmful action.
You can begin with the clean camera and menu exercises even if you do not want to interact with graphic systems. If you do continue into the full sandbox, remember the 18+ warning and keep the purpose clear: learn what this software displays under a controlled setup. That makes your conclusions more accurate and your time in the game more rewarding.
Trauma Lab is in development. Check the official game page and developer updates for current availability and changes. This independent guide discusses a fictional game, not medical practice.