Before you begin
- Choose a category, then confirm the active item in the instruction strip.
- Search and tab filters can hide items until they are cleared.
- Reset between comparisons so each tool has a useful baseline.
Categories are a navigation system
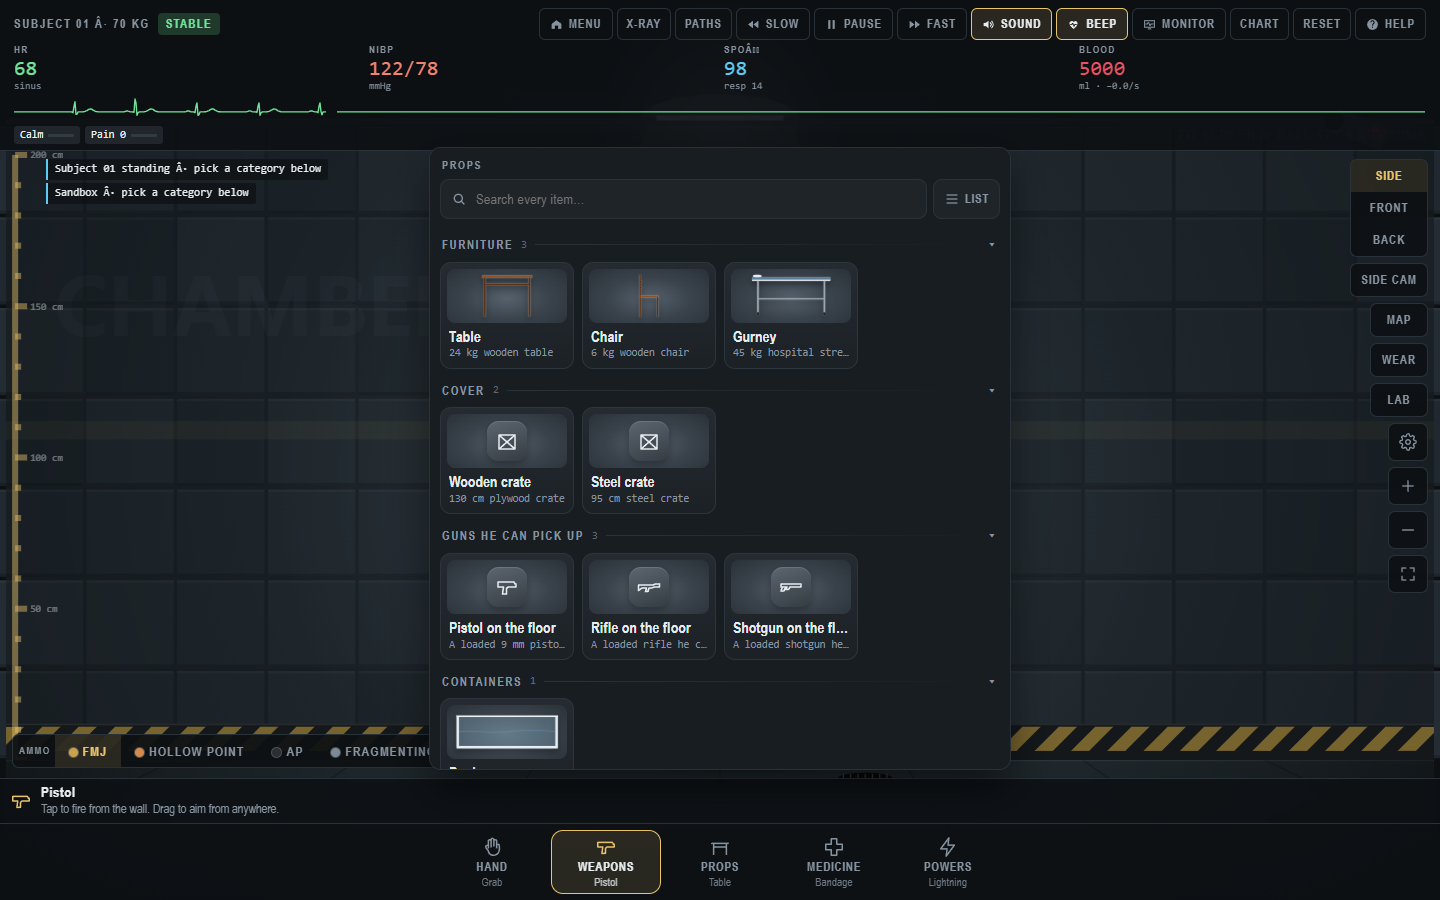
The five buttons along the bottom of Trauma Lab are a map of the sandbox, not a complete inventory printed on one screen. The browser build captured on 31 October 2026 labeled them Hand, Weapons, Props, Medicine, and Powers. Each opens a picker or selects a default action; the instruction strip above the buttons tells you what the current item does and how to use it. The picker can contain a search field, tabs, section headings, and item cards. This guide teaches a method for finding and testing tools without relying on a brittle claim about an exact item count. The game is in development, and the creator's update posts show that the catalog changes quickly.
This article describes a fictional game with graphic adult content. It does not tell anyone how to use a real weapon, chemical, or medical device. When the game uses a real-world name, treat it as an interface label and check the on-screen game prompt. The screenshots of the Medicine and Props pickers in the guide library were captured from the browser build on 31 October 2026. They show how the menus are organized at that moment, not an official catalog for every future version.
The five-step tool-selection loop
First, identify the question you want to answer. “What happens if I choose this item?” is too broad if several categories, camera views, and settings are changing at once. A more useful question is “Where does this item appear in the menu?” or “Does the visible scene change when I place one prop after a reset?” Second, check the current mode. Sandbox exposes the broadest set of categories; Keep Him Alive is described as medicine only. Third, open the right category and read the group headings. Fourth, select one item and read the instruction strip. Fifth, act once, observe, and reset if you want a clean comparison.
This loop avoids a common source of confusion: the category button may continue to display a previous or default item. Opening Medicine does not by itself mean Bandage was applied. Opening Props does not place a table until you select and use it. An item card can be visible while a dark scrim blocks the chamber. The exact action happens only after you follow the tool's current instruction, which may involve a click, drag, hold, or specific target. If a result surprises you, check the selected item name before attributing the effect to the whole category.
When comparing two tools, keep the scene, view, and settings as similar as possible. A new object can alter physics, and a previous action can change the subject's state. Reset between trials. If the game has a random element or active ragdoll variation, repeat each test more than once and describe the range of observations rather than declaring one deterministic rule. The experiment workbook provides a note format for this approach.
Hand: direct interaction
The Hand category is the most intuitive place to learn basic interaction with the scene. Its default visible label in the observed build is Grab. Use it to understand the difference between clicking an object, dragging it, and releasing it. Practice with a harmless scene object before you try to interpret a complicated body movement. If you grab the subject or another object and it moves unexpectedly, the explanation may be pointer position, physics, or the view angle. Return to Side, reset, and repeat with a smaller movement.
The Hand tool can also help you distinguish an object that has been spawned from one that is merely selected in a menu. A prop in the scene may have weight and collision behavior that a UI thumbnail does not. The creator's v1.21 notes describe active ragdoll reactions and bodies colliding. That means direct manipulation may produce varied motion. Treat each result as an observation in the current build, not a guaranteed animation sequence.
If the Hand action seems unresponsive, close all overlays, check Pause, and inspect the bottom instruction strip. A tool from another category may still be selected. Try clicking a clearly visible object away from the subject and watch for cursor feedback. Do not immediately reset the whole scene if the only problem is a hidden picker or camera position. The controls guide explains how to recover from those interface states.
Weapons: a large comparison space
Weapons is broad in the current build, and the creator's v1.21 post lists additions such as a taser, stun gun, batons, saws, drills, lasers, and a katana. The menu also shows the current selected weapon and may expose ammunition choices such as FMJ, hollow point, AP, and fragmenting. These are game labels. The useful first exercise is to find the categories and instructions, not to maximize damage or reproduce real-world use. Read the selected item's short prompt, choose a camera angle, act once, then examine what the game records.
The top monitor and Chart can show more than the animation alone. If a visible effect appears dramatic, compare it with the chart before concluding what the game simulated. If the chart changes but the body looks similar, inspect with X-ray or change view. If a tool's effect seems inconsistent, reset and try the same input again. The creator explicitly describes active ragdoll behavior that changes from event to event, so movement alone may not be a stable measure of an item's mechanics.
Keep performance in mind. The developer's v1.21.2 performance post discusses expensive drawing during repeated heavy hits and improvements to that path. A large number of simultaneous effects can still stress a device. If a test becomes choppy, lower graphics settings or simplify the scene before interpreting frame-to-frame animation. The weapons guide focuses on comparison methodology rather than a sensational ranking.
Props: make the scene legible
The observed Props picker groups items under headings such as Furniture, Cover, Guns He Can Pick Up, and Containers. A table, chair, gurney, wooden crate, and steel crate are visible in the captured menu. These labels help you predict where to look for an object, but they do not define every interaction. An object may collide, fall, move, or provide a surface in the simulation. To learn its role, select one prop and place it in a clear, empty scene. Watch its position from two views before adding another object.
Props are useful for controlled physics experiments because they can create a visible reference point. Place a single table or crate, record where it appears, then reset and repeat. If you compare a wooden and steel crate, keep the placement similar. Do not assume the game models real-world mass or material response accurately simply because the item card uses familiar material names. The in-game description may include a weight, but that is a simulation parameter. Use the value to compare within the game rather than extrapolate outside it.
Some props may introduce new behavior beyond passive furniture. The v1.21 developer notes say bodies now collide and thrown objects can hit them. The v1.20 notes mention an option to spawn another character, while also noting that characters did not yet interact with each other in that release. These statements show why version context matters: a tip about object collisions can become wrong after an update. Check the current Lab and Props menus if a feature seems absent. Our physics guide explores how to test those scene systems without guessing hidden rules.
Medicine: grouped by simulated purpose
The Medicine picker in the observed browser build shows tabs such as Surgery, Drugs, and Chemicals. Under Surgery, visible groups include Bleeding Control, Burns, Wound Repair, and Bones & Limbs. Items shown in the screenshot include Bandage, Gauze pack, Tourniquet, Burn gel, Suture, and Graft. These names are drawn from the game interface. They should not be treated as real treatment recommendations. The game may simplify prerequisites, outcomes, or timing, and a guide cannot safely convert its rules into health advice.
Use Medicine first as a navigation exercise. Open the picker, scan its headings, switch a tab, search for a name, and close it. Then choose one item and read the instruction strip. The item may require a particular target or sequence in the game. If nothing happens, check whether the game is paused, whether the panel is still open, and whether the selected item is actually active. In Keep Him Alive, read the case prompt before trying a medicine item. The game constrains that mode, so the relevant question is what its feedback recognizes, not what you would do in reality.
The v1.20 devlog mentions splints and prostheses, and the observed menu includes a Bones & Limbs group. The creator also offers Simple and Complex surgery settings. To compare those settings, use the same game situation, reset between tries, and record what the game asks you to do. Do not assume that the word “Complex” corresponds to medically realistic procedure. Our medicine guide explains the interface and case-reading strategy in more detail.
Powers: separate spectacle from measurement
The Powers category is labeled with a default Lightning item in the observed build. The v1.21 playtest notes also mention a laser beam under Powers. These abilities are plainly fictional, and their effects are best understood as sandbox systems. Select one power, read its prompt, and use it once in a clean scene. Watch the immediate visual response, then inspect monitor or chart changes if you want to compare with another action. Reset before testing a different power. A visually impressive effect does not by itself tell you what variables the simulation changed.
When comparing powers with weapons or props, be explicit about the category. A laser pistol is listed as a weapon in the developer notes, while a laser beam is described under Powers. Similar names can hide different input methods or effects. Search both categories only after checking the current build. If an item has moved between releases, report the version and the menu where you found it rather than assuming the earlier guide was fabricated.
Powers may also place a heavy rendering load on a phone. The game's graphics presets can help if repeated effects slow the browser. Change performance settings before repeating a test so the comparison is not dominated by dropped frames. This matters especially when you are judging timing. The performance guide gives a more systematic way to adjust the browser build.
Search, tabs, and changing inventories
Search fields make large inventories manageable, but they are only as useful as the exact term you enter. If you cannot find an item, try the visible group heading first. A plural, alternate spelling, or renamed tool may fail an exact search. Clear the search box before switching tabs so an old query does not make the new tab appear empty. If the picker has a list view, use it when thumbnails are too small or the phone screen is crowded. The menu layout can change; use the labels shown by your build.
The creator has added items and revised menus over successive devlogs. That is why this guide emphasizes a search method rather than presenting a frozen “complete list.” A count copied from an earlier build can become misleading within days. If you need to know whether a specific item is in the current free browser version, open that version and search its picker. Then compare with the official page's latest build information. A supporter or modded build may have a different inventory, so include the edition when sharing a list.
If a newly announced tool is missing, work through a short checklist: confirm the build version; check whether the tool was announced for a playtest rather than the free release; inspect the right category and tab; clear search filters; check whether a mod or option affects the menu. Only after those steps should you report a missing item. This protects both you and the creator from troubleshooting the wrong version.
The safest way to share a tool tip
A useful tool tip names the mode, build, category, item, view, and action. It says what the game displayed afterward, with a screenshot or short note if possible. It avoids claims about real anatomy, physics, or treatment. For example, “In the browser build checked on 31 October 2026, the Medicine picker showed a Bleeding Control group” is verifiable. “This always fixes a serious injury” is not supported by a menu screenshot and could be dangerous if taken outside the game.
When a player asks “Where is the tool?”, link to the official game and explain the navigation path. When they ask “Why did it behave differently?”, ask about mode, build, selected item, active settings, and whether the scene was reset. Those questions are more helpful than a confident answer based on a single dramatic screenshot. The experiment workbook provides templates for comparing tools while minimizing confusion.
Sources and further reading
The category names and menu structures above were observed directly in the browser game on 31 October 2026. The official itch.io page identifies the game and its release status. The v1.20 devlog, v1.21 playtest notes, and v1.21 free update document specific additions. These sources establish announced features; your running build is still the check for what is currently available.
Continue with Controls if the picker or overlay behavior is confusing, Anatomy if you want to read the outcome panel, or Physics for props, ropes, and scene experiments. Keep the game disclaimer in mind throughout: Trauma Lab is fictional adult entertainment, not an instruction manual for real tools.
Trauma Lab is in development. Check the official game page and developer updates for current availability and changes. This independent guide discusses a fictional game, not medical practice.