Before you begin
- X-ray, the monitor, and Chart show different parts of the fictional simulation.
- A visual effect and a changed readout are separate observations.
- Do not treat in-game labels as medical measurements or diagnoses.
Check the version of the readouts
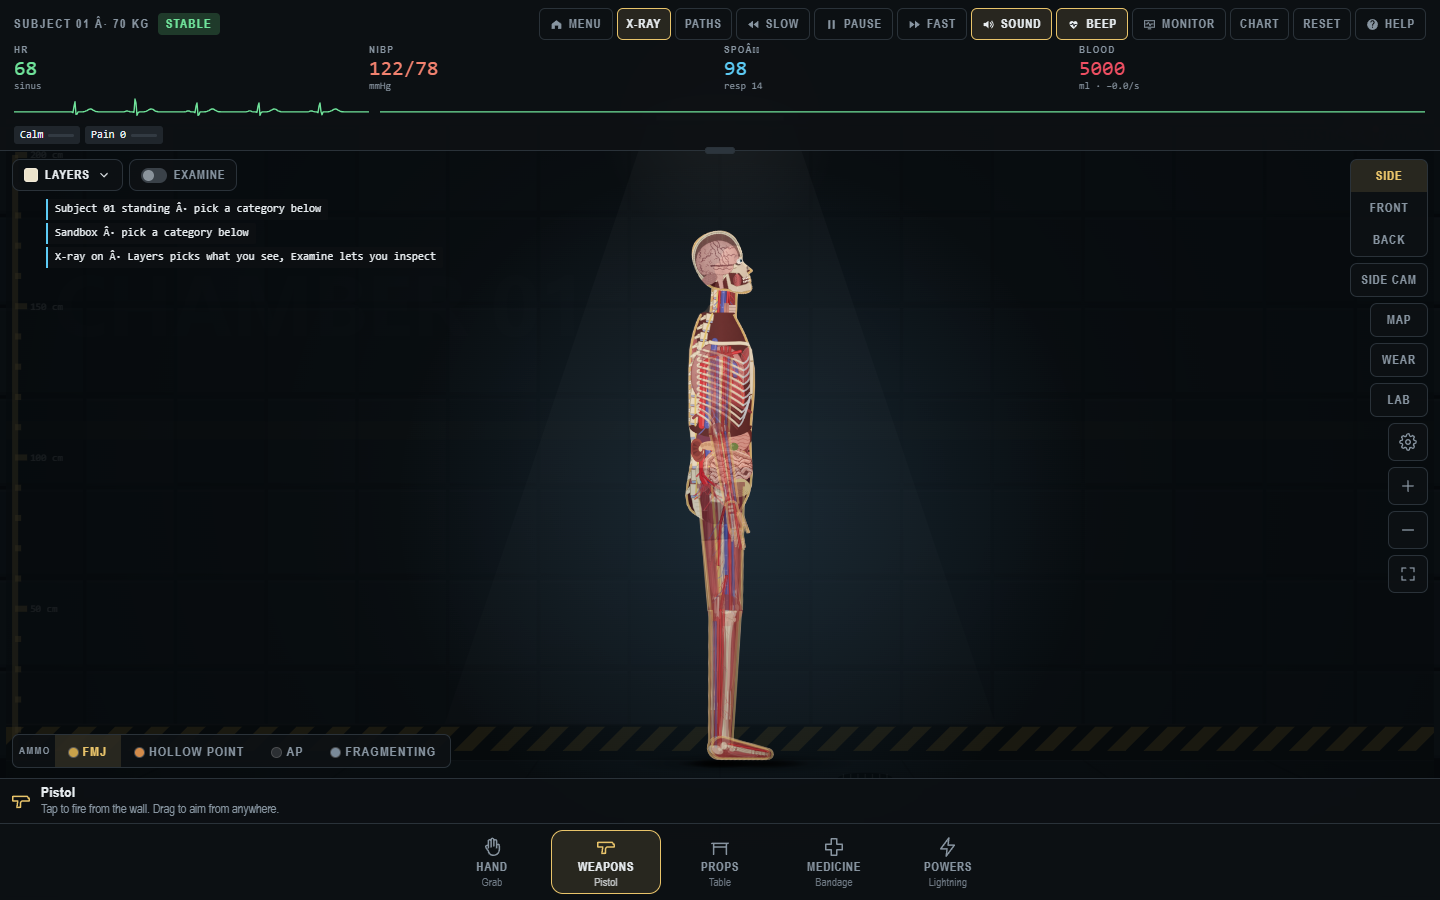
The monitor and Chart screenshots here were captured on 31 October 2026. The creator's v1.23 patch notes announce changes to monitoring, including a BP cuff, urine output, temperature, and pupil responses. The v1.24 release post records when v1.23 became free. Check your build's labels before comparing a new readout with the older images below. We have not re-captured the later browser interface.
Read what the game actually shows
Trauma Lab's pitch centers on tracking events through skin, muscle, bone, and organs. The live browser build makes that idea visible with an X-ray toggle, layer controls, a top monitor, and a Chart panel. These interfaces provide different views of one simulated state. None is a real medical instrument, and the familiar terms should not be used to interpret a real person's condition. This guide is about reading in-game feedback accurately enough to compare sandbox actions and understand case prompts.
Our screenshots show a starting subject in Side and Front X-ray views and a Chart panel with organ, bleeding, skeletal, drug, and neurologic or respiratory sections. They were captured on 31 October 2026 from the browser game. Later builds can rename a layer or change a reading. Treat the on-screen labels in your own session as primary. The official itch.io page calls the project an anatomy and physics sandbox in development, which is why a guide must separate a visible game mechanic from any claim of scientific accuracy.
Begin with a baseline
Before using a tool, look at the subject, status label, and monitor. In one observed clean Sandbox state, the subject was marked Stable and the monitor showed heart rate, blood pressure, oxygen, and blood-volume fields. The exact starting numbers are not rules. They are the baseline for that session. A different build or mode could start differently. If you want to compare two actions, reset between them and verify that the starting state is comparable. Otherwise a change left by the first action can contaminate the second test.
Open Chart while the scene is still clean. The panel may show organ bars marked intact, no vessel injuries, zero bleeding, no fractures, and no drugs given. These are useful reference categories. Close the panel and make one in-game action; then reopen it. Ask which fields changed, which stayed the same, and whether the visible scene agrees. This is a better approach than staring at one dramatic animation and guessing what the simulation recorded. A field can change without an obvious surface effect, and a visual effect can be more stylized than the underlying chart data.
Write down the mode and selected view with the baseline. A Side image and a Front image can make the same internal representation look different. If the camera was zoomed, that changes what you can inspect. A clear note might say: “Sandbox, front view, X-ray on, Chart closed, no item used, starting status stable.” That gives you enough context to compare a later screenshot. Do not record a baseline as a fixed medical normal; it is a game state.
X-ray is a visualization toggle
The X-ray button in the top toolbar changes how the subject is drawn. In the observed build it reveals internal structures, including bones and organs, and adds controls labeled Layers and Examine. The Side view exposes depth in one way; Front shows the full body in another. Turn X-ray on and cycle views before using a tool. This lets you learn what the interface is drawing without an injury or prop obscuring it. Toggle it off again to compare the ordinary and internal representations.
Do not mistake the X-ray view for a real radiograph. It is a stylized game visualization. Colors, proportions, and omissions serve playability. If the image suggests that an item passed near an organ, verify in Chart or a wound readout before claiming a particular simulated injury. The game's internal collision and damage model may be more detailed or less detailed than the illustration. A screenshot of the X-ray view proves only what was visible at that moment.
The Layers control appears near the X-ray view in the current interface. Use it to choose what to display, then note the selected layer in your experiment log. If a structure disappears when you change layers, it may be hidden for inspection rather than removed from the simulation. This distinction is crucial. Likewise, Examine may reveal information about a selected structure, but you should read its current prompt rather than assume that a click anywhere in the chamber has the same meaning. If an X-ray feature is absent, check whether the mode, viewport, or build has changed.
The monitor's four prominent fields
HR, NIBP, SpO2, and Blood appear across the top in the observed build. The monitor also has a trace and a status indicator. In a controlled experiment, a shift in one of these fields can help you see that the simulation responded. But the readouts are simplified game signals. A field remaining stable does not prove that nothing happened; the Chart or wound log could show a different effect. A field changing does not establish a real causal relationship outside the game. Describe the display, not a diagnosis.
The Blood field can be useful for within-game comparison because it is prominently shown and the Chart includes bleeding information. If you are comparing two runs, record the starting value and the amount shown after one action. Repeating the same setup helps you learn whether the result is consistent. If you used a different view or target point, say so. The current build's mechanics may track both visible and internal effects, and a single summary number can hide that distinction.
SpO2 and NIBP are especially easy to overinterpret because they resemble clinical abbreviations. In this guide they are simply labels on a fictional HUD. If a case mode gives an objective, follow its game prompt and feedback. Do not convert a game number into advice about treatment. This site deliberately avoids a table of “normal” real-world values because the purpose is to explain a game interface, not to offer health guidance.
Chart: a second layer of evidence
The Chart panel is more detailed than the monitor. The observed clean-state screenshot lists named organs with condition bars, bleeding totals, skeletal status, drugs on board, consciousness, and brainstem readouts. A player can use this panel to answer a narrow question: did the game register a change in this category? Open it after a single action, compare with the baseline, and close it before the next interaction if it blocks the scene. The panel's Close button is distinct from Reset; clicking the wrong control can erase the state you wanted to inspect.
Chart can help distinguish an animation from a mechanical state. For example, active ragdoll behavior may make the subject stagger or fall in varied ways, according to the creator's v1.21 notes. A fall can look dramatic while a particular chart field remains unchanged. Conversely, a chart field can change without a visually obvious effect. Neither observation invalidates the other. They are different outputs of the same simulation, and they should be reported separately.
If a Chart field is truncated on a small screen, try landscape orientation, fullscreen, or a larger viewport before deciding it is missing. The panel may scroll. Record the field label and value exactly as displayed. Do not extrapolate a hidden calculation from the number. If a tooltip or detail view exists, read it in the current build. A guide based on an older layout should not override the text you can see now.
Wound information and paths
The game's description emphasizes tracking a projectile through layers, and the top toolbar includes Paths in the observed build. Those are clues about how the creator wants players to inspect an event. After a single in-game action, look for a wound log, chart entry, or path visualization. Compare the entry with the X-ray view and the visible surface. Do not infer a precise trajectory from a two-dimensional screenshot alone. Camera angle and internal representation can change how a path appears.
The first useful question is whether the game recorded any event at all. If the visible scene changed but no wound data appears, perhaps the action was a prop collision, a missed target, or an effect the chart does not log. Check the selected tool and read the instruction strip. If a path is shown, note the view and the layer setting. Reset and repeat at a similar target if you need to understand a specific mechanic. One event is a demonstration; repeated controlled events are evidence of a pattern.
The current game has several ammunition labels, but this guide does not rank them or teach real-world use. In a fictional simulation, a label can be used as a comparison variable. Hold the scene, view, and action constant and change only the in-game ammo choice. Then compare the displayed log and chart. That method is useful for understanding the software while avoiding unsupported claims about physical reality.
Bones, limbs, and prostheses
The creator's v1.20 post says it added a splint mechanic for broken limbs and prosthesis choices for severed limbs. The Medicine picker in the observed build includes a Bones & Limbs group. To understand how those game systems relate, first locate the group and read the in-game item prompts. Then compare a clean state with a state the game itself labels as fractured or missing a limb. Use the Chart's skeletal section if present. Avoid assuming that an illustration, a number, and a tool all use the same update timing.
This is one of the clearest examples of why game mechanics and real treatment must be kept separate. The creator is building a sandbox system where a selected item can change a simulated state. That does not make the item a real clinical procedure or the resulting animation a demonstration of a safe method. Describe the game signal: a fracture label, a changed status, an item becoming available, or an animation. Leave real medical decisions to qualified professionals.
If you cannot find the splint or prosthesis entry, verify that you are in a build where the feature is available and that you are looking in the correct category or tab. A mode can restrict tools. A menu can be filtered by search text. A later update can rename an item. Check the official release notes before treating an older guide's screenshot as an exact current map.
Anatomy as a comparison exercise
An effective anatomy experiment begins with a question that can be answered by the game's own displays. “Does this action change the chart's organ status?” is answerable. “Is this anatomically perfect?” is too broad for one play session. Start from a reset, choose one view and layer, open Chart to record the baseline, close it, perform one game action, then inspect X-ray, paths, and Chart in the same order. Repeat with a control trial if you care about consistency. Keep notes on the target point and selected item.
If two trials differ, look for changed variables before declaring randomness. The selected view, camera position, active X-ray layer, body movement, scene props, and tool action can all affect what you see. The v1.21 active ragdoll update explicitly adds varied balance and recovery behavior, so a subject may move between the time you aim and the time an effect occurs. A simple reset plus a slower single action can clarify more than a long series of rapid events.
For visual communication, use paired screenshots: one baseline and one after the action, with the same view and similar zoom. Include Chart or a wound entry in a separate capture if it matters. Avoid cropping away the mode, view, or selected tool. A compelling isolated image can be misleading if it hides the context needed to reproduce the result. The six screenshots in this library deliberately show controls as well as the subject for that reason.
Version changes and limits of certainty
The project is in development and the developer has already changed drawing and performance behavior. The v1.21.2 performance note explains that some wound graphics are cached and refreshed only when needed. That can alter how quickly a visual change appears without necessarily changing the underlying simulation state. A temporary visual delay or frame drop should be investigated before it is described as a damage rule.
The creator's published description says bullets are tracked through layers. It does not specify every formula, every organ interaction, or every version's exact numbers. This guide therefore avoids a made-up damage table. If you want precise current mechanics, inspect the game and the developer's latest notes, then label your own findings as observations. If you cannot reproduce a result, say so. Honest uncertainty is more useful to another player than an invented certainty.
Sources and next steps
The official itch.io listing supplies the project's description and development status. The v1.20 and v1.21 devlogs document additions that affect the anatomy view and body behavior. The specific menu, monitor, and Chart labels here were observed in the browser build on 31 October 2026. Any later build should be checked directly.
For a practical route through the controls, read Controls and Interface. For item selection, see Tool Categories. For a structured set of low-assumption comparisons, use the Experiment Workbook. Keep the central limit in mind: these are ways to read a fictional game state, never ways to assess a real person's health.
Trauma Lab is in development. Check the official game page and developer updates for current availability and changes. This independent guide discusses a fictional game, not medical practice.