Before you begin
- Begin in Sandbox and locate the view, category, monitor, and reset controls.
- Try one tool at a time; compare its visible effect with the monitor or Chart.
- Use the current on-screen prompt whenever a tool behaves differently from this guide.
What this guide is for
Trauma Lab does not behave like a conventional level-based action game. It is an evolving anatomy and physics sandbox whose interface offers several ways to begin. The official page calls it a simulation, and the current browser menu presents Sandbox, Keep Him Alive, Mods, and a Story Prototype. A first session goes better when you choose one question to investigate, learn where the controls live, and reset before changing another variable. You do not need to memorize every tool. The fastest route is to locate the menu, the bottom category strip, the top monitor, and the reset control. This guide walks through that route without pretending that a fictional game teaches real medicine.
The instructions below were checked against the browser build and the creator's itch.io page on 31 October 2026. The build can change quickly. If a label or control has moved, trust the text in the game you are actually running. The screenshots in this library show one build at one time; they are evidence of the interface, not a promise that every player will see identical options. Adults should also know that the game displays graphic wounds and gore. If you are uncomfortable with that content, do not start the simulation.
Before you press Sandbox
Open the game through the site's Play page or the official itch.io listing. The browser build can take time to load because it contains the simulation and its artwork. Let the splash screen finish, or use the on-screen skip action if it appears. Avoid pressing several controls while the page is still loading. If a panel appears immediately after the menu, read its title before dismissing it: the current build may show a What's New notice, an Options panel, or a short Quick Start tip. These are different overlays, and an overlay can intercept clicks on the category strip underneath it.
Look at the four large menu choices. Sandbox is marked as free play with every weapon, tool, chemical, and power. Keep Him Alive is described as ten emergencies with medicine only. Mods is for importing player-made content, and Story is explicitly labeled Prototype. For a first visit, choose Sandbox. It exposes the widest set of systems without demanding that you solve a case. You can return to the menu later to try the other modes after you understand the basic controls. Do not assume that a mode's content is identical between the browser, Windows, and Android versions; check the official listing for the current build.
The menu also displays a surgery-mode choice, Simple or Complex. Simple is the sensible starting point if you want to see how the game represents treatment without handling every individual operation step. Complex is there when you want to engage with more detailed tool interactions. The names describe game settings, not the difficulty or safety of any real procedure. Pick one, remember it, and leave it alone for your first comparison. Changing mode and surgery complexity together makes it harder to tell which setting changed the experience.
Read the screen from the outside in
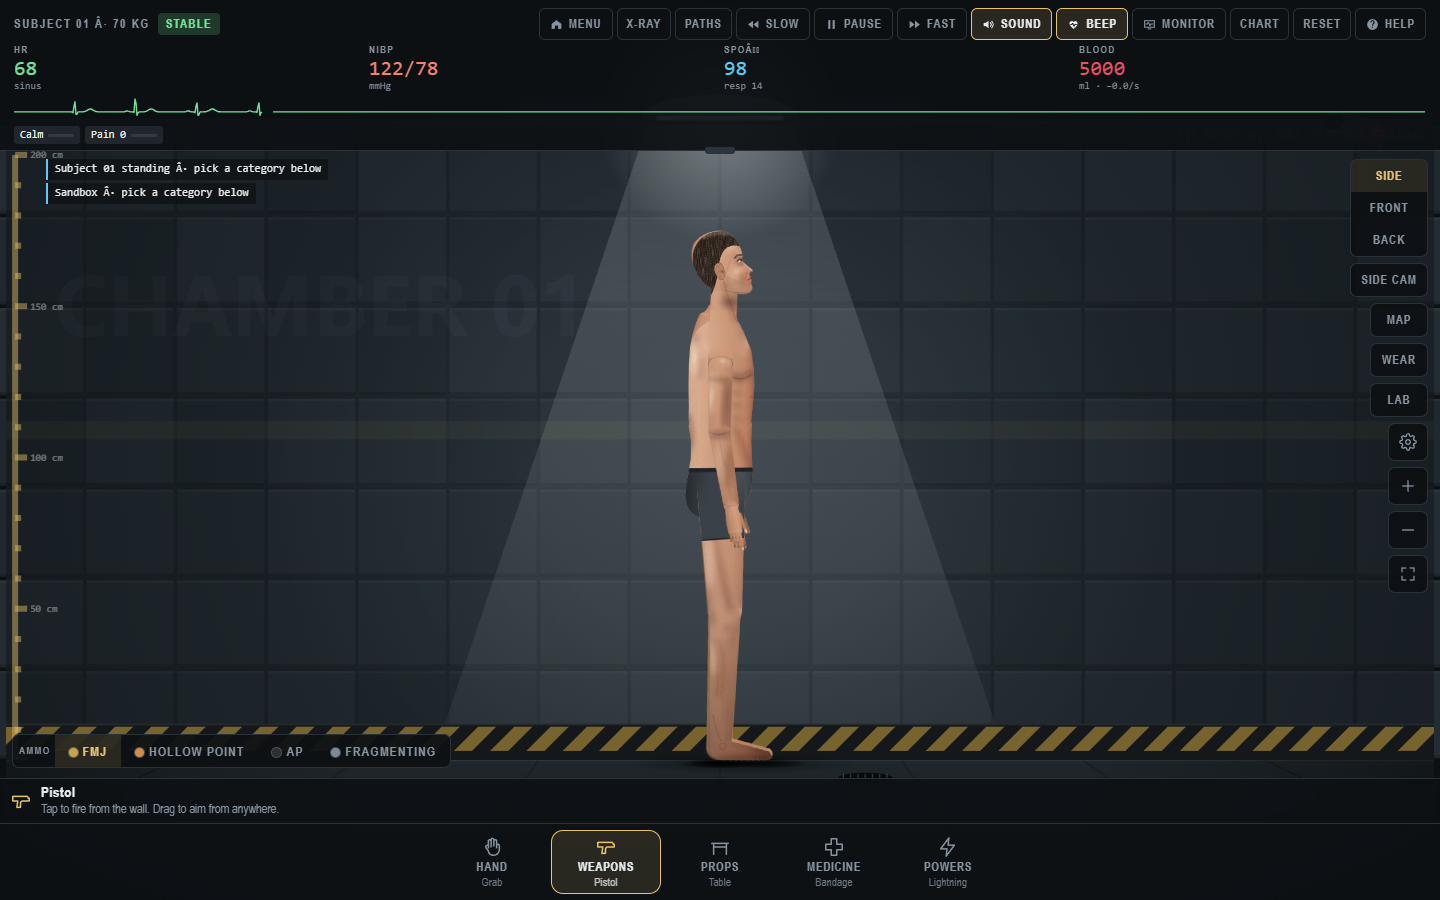
After entering Sandbox, pause for a moment before interacting with the subject. At the center is the simulated person and the test chamber. A horizontal row at the top contains controls such as Menu, X-ray, Paths, Slow, Pause, Fast, Sound, Beep, Monitor, Chart, Reset, and Help. The order can change with viewport size or updates. At the right edge you can find Side, Front, and Back views, plus other scene-related controls. The bottom edge contains the five main tool categories: Hand, Weapons, Props, Medicine, and Powers. The highlighted category and selected tool can persist between sessions or be preselected by the game, so inspect them rather than assuming a neutral starting state.
The vital-sign monitor stretches across the upper portion of the game. It displays labels including HR, NIBP, SpO2, and Blood, together with a status indicator. These are simulation readouts. They can help you compare one in-game action with another, but they are not clinical measurements and should never be interpreted as advice about a real person. The chart panel can show more detail about organs, bleeding, skeletal state, drugs, and neurologic or respiratory readouts. You can open it after an action, then close it to regain space. At first, learn where the monitor and chart are; you do not need to understand every number.
The immediate goal is orientation. Find the Menu button so you know how to exit, the Reset button so you can start a new subject, and the Help button so you can check instructions in the current build. Locate the right-side view switcher and move between Side and Front without using any tools. This simple navigation test tells you whether your pointer, touch input, and browser scaling are behaving normally. If a button is partly hidden, try the game's fit or fullscreen control, or move to a larger screen before concluding that the feature is missing.
A five-minute first exercise
Start with a harmless visual comparison. In Sandbox, view the subject from the side and note the starting status and monitor values. Switch to Front, then Back, and return to Side. Turn X-ray on and off. In X-ray mode, look for the Layers and Examine controls; these appear in the current browser interface and help you inspect the representation of internal structures. The purpose is to learn where the visual information comes from, not to diagnose anything. Take note of which view gives you the clearest sight of the object or body area you want to inspect later.
Next, open one tool category without selecting an item. Medicine is useful for this exercise because the picker visibly groups items under headings such as bleeding control, burns, wound repair, and bones and limbs. Props is another good choice because furniture and cover items have recognizable thumbnails. Observe the search field, category tabs, and the list or grid option. Close the picker, then reopen it. If a darkened backdrop appears, click outside the panel or use the game's close action rather than repeatedly clicking a category underneath it. The tool picker is a menu layer; the click-blocking is expected behavior, not necessarily a bug.
Choose one item only after you understand how to close the picker. Read the short instruction line near the bottom of the game before acting. In the current build that line changes with the selected tool. A category may show a default tool before you choose one, so the bottom label is your confirmation of what a click or drag will do. If the item requires dragging, practice with a low-stakes prop and observe how the cursor and object move. If an action produces an unexpected result, reset and try the same action more slowly. Do not add another tool to the scene before you can explain what the first one did.
Learn the reset habit
The reset control is the most important experimental tool in a sandbox. The game may preserve injuries, props, status effects, or selected categories as you continue. If you change several things in sequence, the result can become hard to interpret. A clean reset gives you a comparison point. Before each new exercise, note the subject's initial state, the selected view, the tool, and the setting you care about. Make one change. Watch the visible result and the monitor or chart. Then reset. This is more informative than rapidly testing every button because it lets you isolate the system you are learning.
For example, suppose you want to compare how two props behave when placed near the subject. Begin with one prop, observe where it lands and whether it moves, then reset and try the second in a similar position. If the comparison is about the camera, keep the prop and action constant while changing only Side versus Front. If the comparison is about X-ray layers, keep the view and event constant while changing the layer display. These are observations you can make without claiming that the simulation is physically or medically exact.
Your notes can be very short: “build date, mode, tool, view, setting, result.” The game is under active development, so a note that includes the build matters more than an elaborate description that omits it. If you share a bug report, include a reproducible sequence and what happened after a reset. The creator's development log shows that performance and mechanics have changed rapidly, which is another reason to keep experiments tied to a version.
When you are ready for the other modes
Keep Him Alive changes the task. The menu labels it as ten emergencies and medicine only, so the point is to respond within the game's constraints rather than explore every category. Begin this mode only after you can open Medicine, read the monitor, use Help, and reset. You may be tempted to treat the scenario like a real emergency checklist; resist that. The game's logic is fictional and may simplify, exaggerate, or change systems between releases. Use the prompts and feedback inside the build to understand its rules.
Mods is a separate route for player-made additions. The menu says it can import a .zip containing items such as guns, blades, drugs, props, clothes, and rooms. That does not mean every file from the internet is safe or compatible. If you are new, learn the default Sandbox first. When you do explore mods, use the instructions in the current game, identify the source of the file, and test one addition at a time. A mod can change the scene and make a baseline comparison with the unmodified game less useful.
Story is labeled Prototype, so expect an unfinished experience. The menu describes escaping the lab while controlling the character. That is a different objective from Sandbox observation or the medicine-only cases. If a story mechanic behaves differently, first check whether the mode reassigns a control before filing a bug. Do not write a walkthrough that promises a final ending or a fixed sequence when the creator has not documented one. Our modes guide compares the four entries in detail.
Browser and device checks
If the game stalls or feels slow, first distinguish a slow load from a slow simulation. A blank or static splash while the file is loading calls for patience or a reload. A loaded scene that slows after repeated actions is a performance question. The developer's v1.21 update describes Quick setup choices under Options → Graphics → Performance: Best looks, Balanced, and Max speed. Balanced is the creator's suggested starting point for a phone that lags. Resolution, skin and wound detail, blood and gore amount, physics precision, and frame-rate limits also appear in the published performance notes.
Change one performance option at a time if you want to learn what helps your device. A broad preset is appropriate when your immediate goal is simply to play. If the problem persists, record your device, browser, selected preset, and the action that triggers the slowdown. The developer's performance post specifically asks for device and frame-rate information when reporting remaining lag. Our performance guide explains how to distinguish rendering load, repeated simulation events, and browser constraints without promising a guaranteed fix.
On a narrow phone screen, the game may have less room for its menus, monitor, and subject. Try landscape orientation and the game's fit control. Touch interactions can differ from mouse and keyboard gestures, so read the current on-screen prompts. A standalone Windows build may perform differently from the browser build on some devices, but performance varies by hardware and settings. The official itch.io page is the place to check which files are currently available and under what terms. This site does not host or redistribute installers.
A practical first-hour route
For the first ten minutes, learn navigation. Read the menu, enter Sandbox, locate the top controls and bottom categories, switch views, toggle X-ray, open the chart, and find Reset. Spend the next ten minutes learning the picker: open Medicine and Props, search for a named item, close the picker, and check the bottom instruction line. Use the following twenty minutes for a small number of controlled experiments. Keep the subject and settings stable, change one tool or view, watch the result, and reset. Use the last part of the hour to try either Keep Him Alive or the performance settings, depending on what you want from the game.
This route is deliberately modest. The game offers many systems, and an efficient first session is about building a mental map rather than seeing everything. By the end, you should be able to answer five questions without guessing: Which mode am I in? Which tool is selected? Where can I see the subject's status? How do I change the view? How do I begin again? Once those answers feel automatic, the tool guide, anatomy guide, and experiment workbook become much easier to use.
What not to infer from one run
An unexpected animation is not proof of a hidden feature. A single frame-rate dip is not proof that a device cannot run the game. A monitor value after one action does not establish a fixed damage rule. Early builds can contain bugs, random variation, balance changes, and input differences. The v1.21 developer notes explicitly describe active ragdoll reactions that vary from one event to the next. Treat a surprising event as a question: can you reproduce it after resetting, with the same mode, view, tool, and settings? If you cannot, record it as an observation rather than a rule.
Avoid importing outside medical assumptions into the simulation. The monitor uses familiar terms, and Medicine contains recognizable items, but the game is entertainment. Describing what a tool does in the game is different from recommending it in real life. This guide stays with interface use, game objectives, and observed screen feedback. For a real health concern, seek appropriate professional help rather than consulting a game or game guide.
Sources and next steps
The primary sources for this walkthrough are the official Trauma Lab page, the v1.21 free update, and direct observation of the browser build on 31 October 2026. The creator describes the project as in development; this guide will need checking as the interface changes. The six screenshots in the guide library were captured from the game to help you identify the controls, not to imply that every menu has remained fixed.
If your main goal is to understand the four menu entries, continue to Modes. If your problem is finding a button or camera action, open Controls and Interface. If you want to compare outcomes systematically, use the Experiment Workbook. You can return to the Play page at any point and keep this guide open in a second tab.
Trauma Lab is in development. Check the official game page and developer updates for current availability and changes. This independent guide discusses a fictional game, not medical practice.